Adding Fields to Sections
The following field types can be added to any section:
- Dataset fields
- Expression fields
- Constant fields
- Variable fields
Adding fields to sections is done by selecting a section within the Sections area, then clicking the Fields tab within the Configure Section area. Click the plus button to add a dataset field, or click the arrow to the right of the plus button to view a list of all field types that can be added. Then select the field type that you wish to add to the selected section
Before dataset fields can be added, the datasets must exist within the Datasets area. See Adding Datasets for a description of how to add datasets.

Fields can also be added by right-clicking anywhere within the Fields tab. A menu listing field types that can be added (shown above) will be displayed where you can select the desired field to be added. Fields can also be added by dragging a field (or multiple fields via CTRL-click) from the Datasets area into the Fields area, or double-clicking a field displayed in the Datasets area. If you add a field by dragging it, you will need to select the field in order to have its properties displayed. This is not required when adding fields using the other methods.
Note the Add EZ Expression Field selection. Use of this selection provides a list of the most commonly used functions and allows you to create expression fields more quickly than if selecting Add Expression Field.
Add Dataset Field
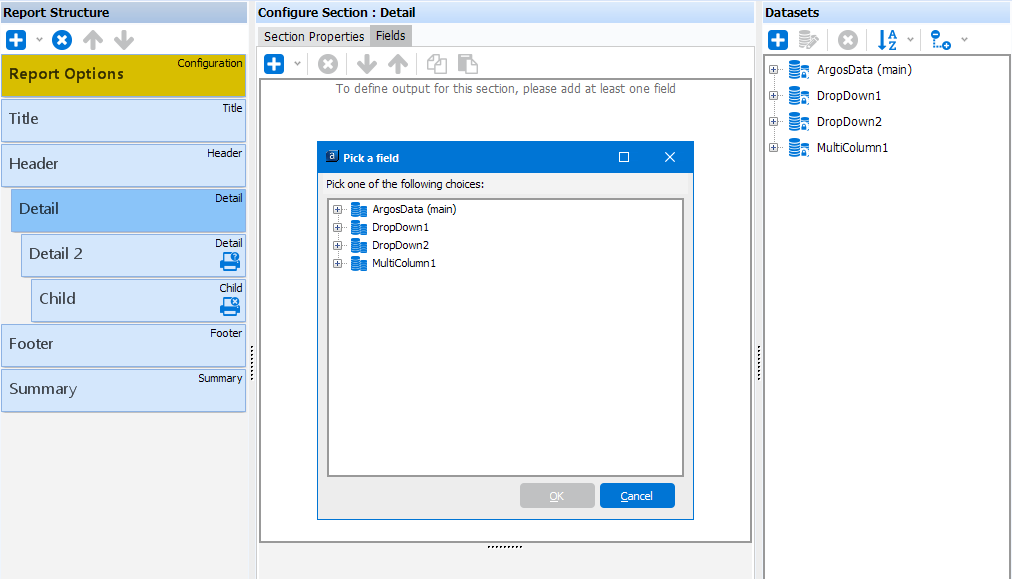
After selecting Add Dataset Field the "Pick a field" dialog box is displayed where you select the field from any of the listed datasets. Double-click on the desired field to add the field to the section. Or you can single-click then click the OK button. The added fields are then displayed as shown in the figure below.
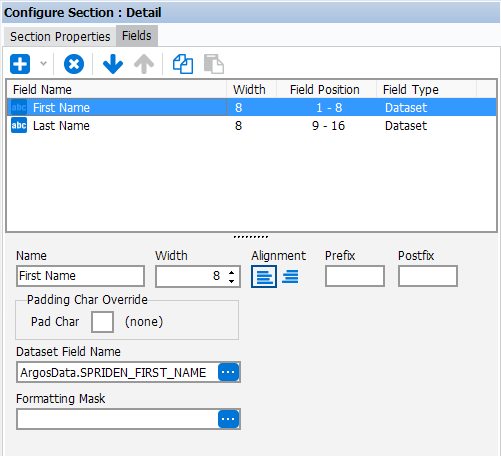
Dataset fields can also be added by selecting a field from the Datasets area and dragging it to the Configure Section area. You can select multiple fields by holding down the SHIFT key then drag the fields. Fields can also be added by double-clicking the field from within the Datasets area.
After the dataset fields have been added, the following items are available for configuring the fields.
| Field | Description |
|---|---|
| Name | The field name obtained from the dataset. The name can be changed, if desired. |
| Width | This field is only visible for fixed width reports and is used to enter the appropriate field width. If the width is set to 0, the field will behave like a variable-width field, resizing to fit the data. |
| Prefix | Entering a string in this field will place the string in front of the field's value. |
| Postfix | Entering a string in this field will place the string after the field's value. |
| Formatting Mask | Click the ellipsis to display the Edit Format String dialog box where you can format the contents of the field using a format mask. |
| Dataset Field Name | Clicking the ellipsis displays the "Pick a field "dialog box where you can choose another dataset field to replace the current field. |
| Alignment | This field is visible only for fixed width reports and is used to specify left or right alignment. |
| XML Element Name | For XML formatted reports, enter the XML Element Name to include in the output file. If not entered, the field name will be used as the XML Element Name. |
| Node Placement | For XML formatted reports this option is displayed and contains 3 options: 1) Attribute: The field will be included as an attribute of the parent element as follows: <Parent fieldname="value">. 2)Sub-Tag: The value of the field will output as a sub-element as follows: <Parent> <fieldname>value</fieldname></Parent>. 3)Text:The value of the field will be output without any xml tags preceding or following it. |
| Output if null | For XML formatted reports, this option allows you to insert a set of empty tags when the data is null. If this option is not checked, the default behavior is to omit both the data and the tags for that record. |
| Padding Char Override | This field is only visible only for fixed width reports. For the selected field, you can override the padding character specified under Report Options. |
Add Expression (or EZ Expression) Field
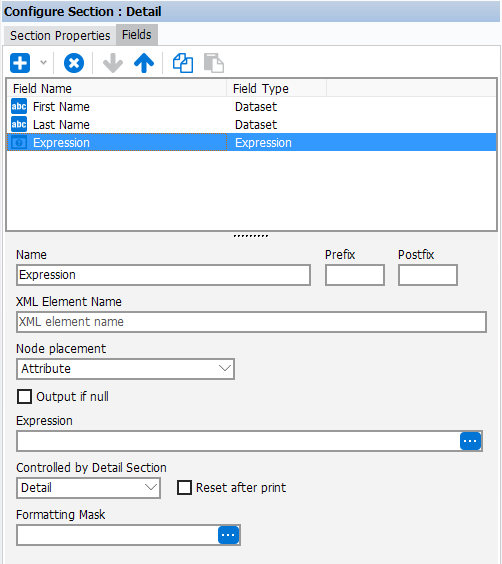
After selecting Add Expression Field, the Expression Field is added and the following items are available for configuring the field.
| Field | Description |
|---|---|
| Alignment | This field is visible only for fixed width reports and is used to specify left or right alignment. |
| Controlled by Detail Section | The expression will be applied to data values within the selected Detail Section. If the "Reset after print" box is checked, the results of the expression will be reset after the referenced Detail Section is processed. |
| Expression | Click the ellipsis to display the Expression Builder where you can create an expression used to determine the value of this field. |
| Formatting Mask | Click the ellipsis to display the Edit Format String dialog box where you can format the contents of the field using a format mask. |
| Name | The field name obtained from the Dataset. The name can be changed, if desired. |
| Node Placement | For XML formatted reports this option is displayed and contains 3 options: 1) Attribute: The field will be included as an attribute of the parent element as follows: <Parent fieldname="value">. 2)Sub-Tag: The value of the field will output as a sub-element as follows: <Parent> <fieldname>value</fieldname></Parent>. 3)Text:The value of the field will be output without any xml tags preceding or following it. |
| Output if null | For XML formatted reports, this option allows you to insert a set of empty tags when the data is null. If this option is not checked, the default behavior is to omit both the data and the tags for that record. |
| Padding Char Override | This field is only visible only for fixed width reports. For the selected field, you can override the padding character specified under Report Options. |
| Postfix | Entering a string in this field will place the string after the field's value. The results of the expression will be used as the value for the field. |
| Prefix | Entering a string in this field will place the string in front of the field's value |
| Width | This field is only visible for fixed width reports and is used to enter the appropriate field width. If the width is set to 0, the field will behave like a variable-width field, resizing to fit the data. |
| XML Element Name | For XML formatted reports, enter the XML Element Name to include in the output file. If not entered, the field name will be used as the XML Element Name. |
Add Constant Field
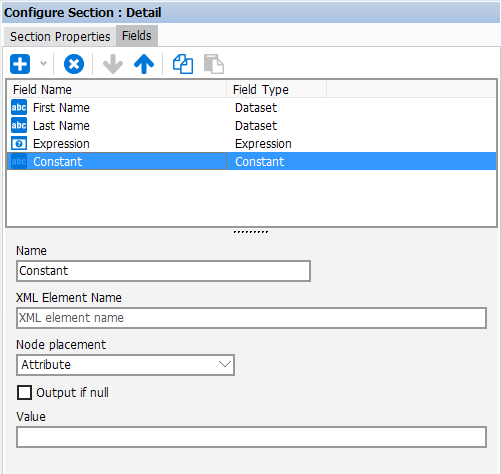
When selecting Add Constant field, the Constant Field is added and the following items are available for configuring the field.
| Field | Description |
|---|---|
| Name | Enter a desired name for the field. |
| Width | This field is only visible for fixed width reports and is used to enter the appropriate field width. If the width is set to 0, the field will behave like a variable-width field, resizing to fit the data. |
| Value | Enter a desired value to be used for the field. |
| Alignment | This field is visible only for fixed width reports and is used to specify left or right alignment. |
| XML Element Name | For XML formatted reports, enter the XML Element Name to include in the output file. If not entered, the field name will be used as the XML Element Name. |
| Node Placement | For XML formatted reports this option is displayed and contains 3 options: 1) Attribute: The field will be included as an attribute of the parent element as follows: <Parent fieldname="value">. 2)Sub-Tag: The value of the field will output as a sub-element as follows: <Parent> <fieldname>value</fieldname></Parent>. 3)Text:The value of the field will be output without any xml tags preceding or following it. |
| Output if null | For XML formatted reports, this option allows you to insert a set of empty tags when the data is null. If this option is not checked, the default behavior is to omit both the data and the tags for that record. |
Add Variable Field
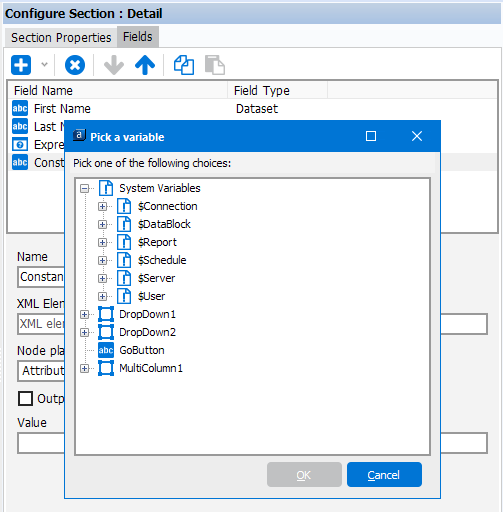
After selecting Add Variable Field, the "Pick a variable" dialog box is displayed where you can select from a list of Argos System Variables to be used in the Section.
Select a variable then click OK to add the variable.
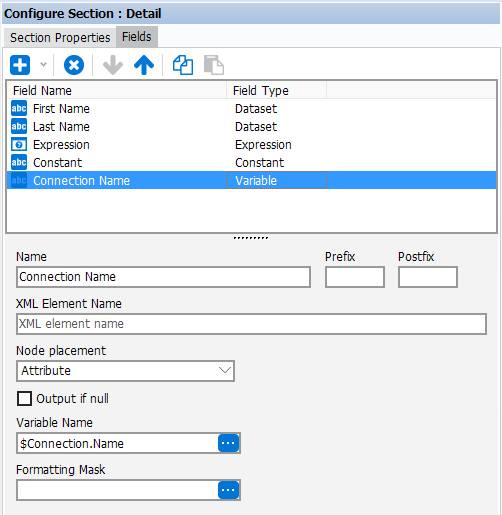
After the variable field has been added, the following items are available for configuring the field.
| Field | Description |
|---|---|
| Name | The field name obtained from the Dataset. The name can be changed, if desired. |
| Width | This field is only visible for fixed width reports and is used to enter the appropriate field width. If the width is set to 0, the field will behave like a variable-width field, resizing to fit the data. |
| Prefix | Entering a string in this field will place the string in front of the field's value. |
| Postfix | Entering a string in this field will place the string after the field's value. The results of the expression will be used as the value for the field. |
| Formatting Mask | Click the ellipsis to display the Edit Format String dialog box where you can format the contents of the field using a format mask. |
| Variable Name | Clicking the ellipsis will display the "Pick a variable "dialog box where you can choose another variable to replace the selected variable. |
| Alignment | This field is visible only for fixed width reports and is used to specify left or right alignment. |
| XML Element Name | For XML formatted reports, enter the XML Element Name to include in the output file. If not entered, the field name will be used as the XML Element Name. |
| Node Placement | For XML formatted reports this option is displayed and contains 3 options: 1) Attribute: The field will be included as an attribute of the parent element as follows: <Parent fieldname="value">. 2)Sub-Tag: The value of the field will output as a sub-element as follows: <Parent> <fieldname>value</fieldname></Parent>. 3)Text:The value of the field will be output without any xml tags preceding or following it. |
| Output if null | For XML formatted reports, this option allows you to insert a set of empty tags when the data is null. If this option is not checked, the default behavior is to omit both the data and the tags for that record. |
| Padding Char Override | This field is only visible only for fixed width reports. For the selected field, you can override the padding character specified under Report Options. |
Renaming fields
There are 3 ways to rename a field:
- Click on the field then change the name in the “Name” field at the bottom of the area. The figure below shows the Name field.
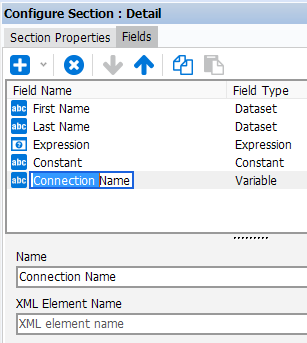
- Perform a slow double-click on the field. The field will then be surrounded by a box. You can then change any characters within the box. The figure below shows the selected field name surrounded by the box after a slow double-click
- Select the field then click the F2 key. The field can then be edited.
Data Types
The following icons are used to represent the various data types.
| Icon | Data Type |
|---|---|

|
string |

|
float |

|
integer |

|
date |
Notes: (applies to all field and section types)
- A right-click anywhere within this area displays a menu with selections allowing you to add, cut, copy, paste, delete, and move fields.
- A left-click on any field will display the list of editable properties in the bottom portion of the area.
If you need additional help creating Extract Reports, refer to the Getting Started with Extract Reports page.